
Audience: Mentor
Table of Contents:
- Video Demonstration
- Downloadable Quick Guide - PDF
- Add or Edit a Mentoring Session
- Guidelines for "Did the Client Start a New Business?"
- Edit Chapter Location
- Add/Store a File in a Session
- Edit Default Session Hours from 1 Hour
- Add Co-Mentor and their co-mentoring session hours
- Update Client Information
- Update Business Information
- Add a New Session from an Existing Session
- Notes and Limitations
- Relevant Resources
Video Demonstration
Download Quick Guide
Contributor: Lori Karbel, SCORE Las Vegas, Engage Volunteer Trainer,
Add or Edit a Mentoring Session
1) From the Home Page, click My Client Requests under My Client Mentoring section.
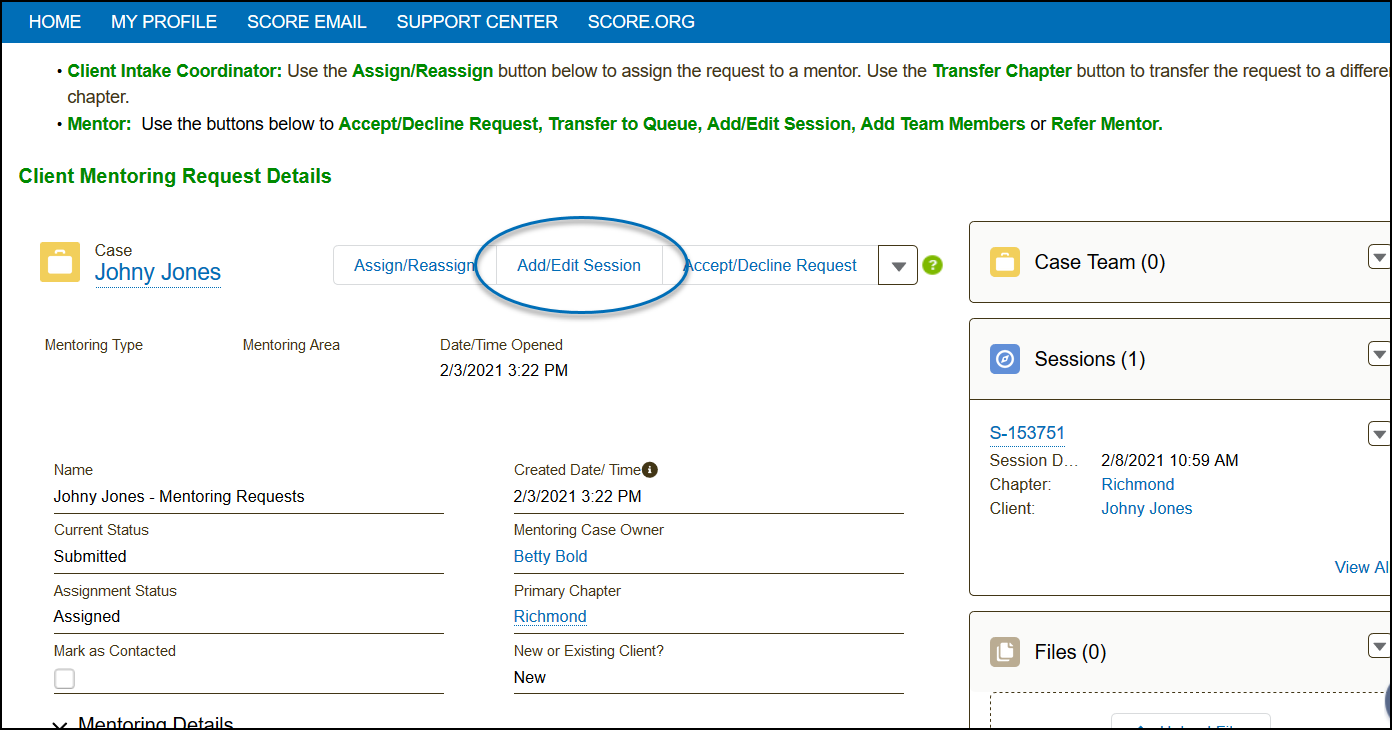
2) Locate the client for whom you want to add a session and click View to access their mentoring request record. 
3) Click the Add/Edit Session button. If no sessions are available for editing, the system will direct you to a single-screen setup to create a new session bypassing the window that appears on the next step in this guide.
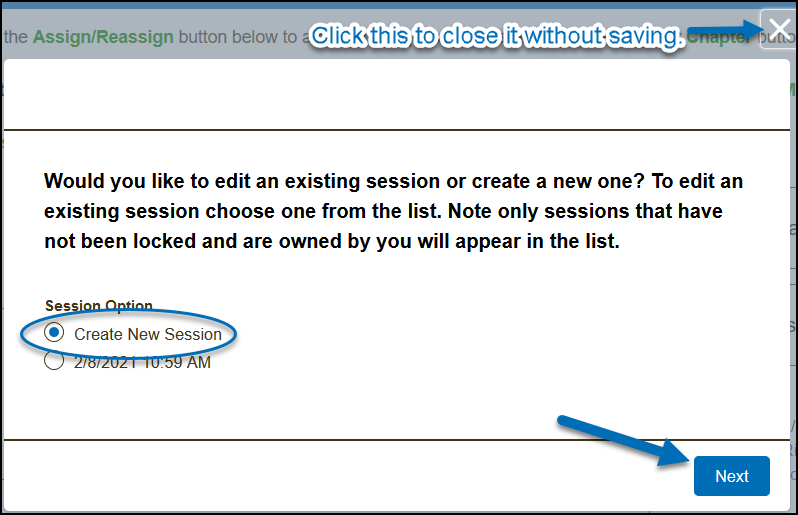
4) This page is displayed only when there are sessions eligible for editing in the current month; otherwise, the system will bypass it and advance to the next step. If you get this page, select create a new session or edit an existing one, then click Next.
5) Add all the mentoring details in this single-screen setup.
-
Automatic Information Defaults - The following fields are automatically populated with the information from the Mentoring Request details submitted by the client with the freedom for you to modify this information as needed.
- Chapter Location (to modify: click on the Edit Location Details box)
- Nature of Mentoring (to modify: select the field and choose an option from the list provided))
- Mentoring Type (to modify: select the field and choose an option from the list provided)
-
Mentoring Hours (not visible on the page)
- Defaulted to 1 hour
- No manual entry needed unless to adjust the hours
-
Session Notes (HTML)
- Apply various text styling to enhance the ability to customize and organize session notes effectively.
- Ease of use for text formatting, especially when copying and pasting from a word processing document or similar application.
-
Did the Client Start A New Business?
- When "Yes" is selected and both the Business Name and Type of Business are available from the Mentoring Request Details, these fields will be automatically populated with that information. Otherwise, enter the business name in the field provided and select the appropriate type of business from the list provided.
- Started business also means that they have registered with the state and has an effective date that the business was established. No documentation is needed.
Other optional items on the Mentoring Session page:
- Edit Location Details
- Other Mentoring Provided – Text field for specifying additional mentoring provided.
- Other Language Used – Enter a language not listed in the predefined options.
- Email Session Notes to Client – Checkbox to email session notes to the client (limited to one-time use).
- Assigned Homework Type – Dropdown menu to select the assigned homework type.
- Other Homework Assigned – Text field for describing homework not listed in the predefined options.
Guidelines for "Did the Client Start a New Business?"
Respond NO - If client's business was established prior to the commencement of them working with us in any capacity (e.g. mentoring, workshops, etc.).
Respond YES - If the client started their business during the period that they were working with SCORE in any capacity (e.g. mentoring, workshops, etc.). Documentation is not required; we accept the client's confirmation for all criteria at face value.
*Started business = registered with the state and has an effective date that the business was established
6) Once you've saved your session, a confirmation window will appear. Click X to end the process and close the window. If you need to modify any default information, click Next.
7) Optional Steps: After clicking Next from the confirmation window, you will be able to edit additional information in the next steps, which are optional. Remember, you can exit from any of these optional pages at any point.
-
-
- Chapter/Branch Information (required action: check Edit Location Details)
- Adjust Mentoring Hours - if you prefer a duration other than the default one hour
- Upload Files
- Add Co-Mentor and their co-mentoring session hours
- Update Client Information
- Update Business Information
-
The following steps are optional, and the pages referred to are accessible when you select Next on the confirmation window instead of clicking 'X' to exit — refer to the image on step 7 above.
How to Edit Chapter Location
1. From the session page, click the box Edit Location Details. And click Next to proceed to the next window.
2. In the Edit Location details window and change the Chapter field (and Branch Location field if applicable). Click Next to be returned to the previous window.
3. The chapter field will show the newly selected entry.
How to Store/Upload File in a Session
1. After saving or editing a session, click Next to store a file in this session. Then click on Select From My Uploaded Files or click Upload Files.
2. Confirm the filed uploaded by clicking Done.
3. After the file has been uploaded, it will show up on the page. Click X to exit or Next to proceed to other optional pages.
How to Edit Default Session Hours from 1 Hour
1. After saving or editing a session, click Next to proceed to the other optional pages until you reach Add a Co-Mentor and Edit Hours page. Click the radio button next to your name and then click the Edit Hours button.
2. Adjust the session hours by clicking on the field to reveal a pick list from which you can select the appropriate hours. Then, click Next to save the new information.
--->
3. You'll be taken back to the previous window, which will now display the updated session hours. You can exit from this page by clicking the X to exit on the top right hand side of this window.
How to Add Co-Mentor and their co-mentoring session hours
1. After saving or editing a session (refer to How To: Add or Edit a (Mentoring) Session guide), click Next to proceed to the other optional pages until you reach Add a Co-Mentor and Edit Hours page. Click the Add a Co-Mentor button.
2. Select co-mentor from the list or search them by name. If you need to add additional co-mentors, save the current selection and then repeat the process for each co-mentor you wish to add. You can add up to a total of four co-mentors in a session.
3. After a co-mentor is added, a confirmation window will appear. Click Next to enter the session hours for the co-mentor.
4. Select the session hours on the field provided and click Next to save the details and return you to the previous page.
5. The co-mentor and their hours has been saved. You can exit from this page by clicking the X to exit on the top right hand side of this window.
Update Client Information Page
After saving or editing a session, click Next to proceed to the other optional pages until you reach the client information page. Update the information from on page and click Next to save the changes. Then click X to exit on the next page.
Update Business Information Page
After saving or editing a session, click Next to proceed to the other optional pages until you reach the business information page. Update the information on this page and click Next to save the changes. If you are unable to fill out the required fields on this page, you can still click X to exit the page.
Please note that although the fields on the Business Information page are marked as required, it is no longer mandatory for mentors to fill them out for the session to be saved in Engage. This page remains accessible for the purpose of recording additional business details. In line with the new SBA guidelines, providing the Business Name and Type of Business is now adequate for SCORE to document whether the client has started a new business during their engagement with SCORE.
How to Add a New Session from an Existing Session
1) From the Home Page, click My Sessions.
2) Click View to access the session record.
3) On the existing session, the mentor can launch the Add/Edit Session flow instead of having to go back to the client mentoring request page. Then follow the prompts to proceed.
Notes and Limitations
Email Session Notes To Client - This function can only be used once and best to use during adding a session. Any subsequent edits made to the session record will not re-send any copy of the edited session notes to the client.
Session Notes Fields - There will be two session notes fields that will be visible in the session notes details page (see image below).
- Session Notes (Text) - Sessions prior to March 1, 2024, will remain in this field, visible yet uneditable. Since not all sessions can be moved to the new field, this area will remain visible but locked from any further editing for the time being.
- Session Note (HTML) - Sessions from March 1 to March 14, 20204 will automatically be moved to the new session notes field.
Comments
6 comments
8/16 - Guide updated to cover the change in the Branch Location field when adding a session. The branch location will show a list of results of all branches since we've opened permissions so that all active mentors on the request case team have access to the client request. This is still a SEARCH field where you can enter the word (or the first few letters of the word) and will search the database and narrows the list of results.
8/19 - Guide updated. We've reverted the change in the Chapter and Branch page when adding a mentoring session. The branch location list will no longer show ALL branches but will only list the corresponding branches of the selected chapter.
11/15/2023 - added note on step 6 in Recording a Session: Note: The functionality for sending an email to the client is limited to a single use during the initial creation of the session only. Any subsequent edits made to the session record will not re-send any session notes.
Please add this functionality to Engage. Updates to the session notes when using them as a place note after the initial creation to record the session is important when adding complete notes subsequently. Adding the ability to email to clients subsequent edits minimizes duplication of effort by the mentor.
3/14/2024 - Guide has been updated to include the new process for adding/editing sessions as details in the Engage Release Notes.
3/26/2024 - Video upddated, added pdf quick guide.
Please sign in to leave a comment.